The WaveFront TillerClutch™ Owner’s Guide
Operation
When properly installed beneath the forward end of the tiller, the WaveFront TillerClutch™ is simple and intuitive to use. It provides a small control lever on the underside of the tiller, within easy finger-reach of your steering hand. The rope clutch mechanism engages a small control line that passes through the device and is attached aft across the cockpit to port and starboard. A touch downward on the lever instantly engages the control line to hold the tiller still. Gently squeezing the lever upward momentarily frees the control line so you can make course corrections. Releasing the lever allows it to return to the engaged position. A firmer squeeze clicks the TillerClutch “off” for hands-free steering. With the tiller centered, the control line should be adjusted so it is not slack, but also not tight enough to cause drag.
Caution: The TillerClutch should not be used for long-term mooring or docking.
Installation
Mounting the TillerClutch is easy, requiring just two screws. No assembly or disassembly is needed. The mounting surface of the TillerClutch is specially shaped to fit tiller shafts that are square, rounded or circular in shape. The TillerClutch is designed to be mounted on the underside of the tiller with the lever pointing forward within reach of your steering hand, about 6 to 7 inches (15-18 cm) from the front of the tiller. To find the best mounting location on your tiller, you may temporarily strap or hose-clamp the TillerClutch in place and experiment with different positions before mounting.
Tools and Supplies Needed for TillerClutch Installation:
• No. 2 Phillips screwdriver, pencil
• Electric drill
• Drill bit 1/8” (3.2mm) diameter for wooden or aluminum tiller
• Tools necessary to remove and reinstall the tiller (Removing the tiller is recommended for installation.)
• Aluminum tillers: Loctite® red “threadlocker”, 262 from auto parts stores, (optional: two #8 x 32 x 1-1/4” flat-head stainless machine screws and a #8 x 32 tap for threading the holes)
Positioning the TillerClutch

It is important to attach the TillerClutch with its lever pointing forward and centered directly under the tiller, so that the front screw is about 6 to 7 inches (15-18 cm) from the forward end of the tiller.
Never mount a TillerClutch back toward middle of tiller. That position will cause problems and be less convenient to use. (It should be as accessible as a bicycle’s hand brake.)
Keep in mind locations of other accessories: hiking-stick, autohelm, GPS, etc. The pictures above show the two control line options.
Routing the Control Rope
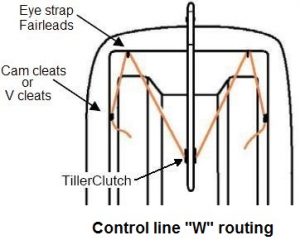
![]()
This is the basic control rope set-up with the fewest attachment points for the control line. Attach the rope to the back (transom) of the boat with V cleats or cam cleats. The cleats can be attached to the boat anywhere in this general area, as long as they are not too close to the rudder. It is best to experiment with different positions before screwing on the cleats.

The cleats could be attached to the sides of the boat (coamings) instead if desired.

Optionally, route the line through fairleads on the transom and forward to cleats on the sides on larger boats, if desired.

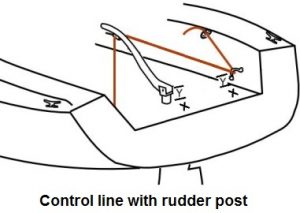
For boats with a low rudder post-mounted tiller, align the fairleads or the cleats in line with the tiller bolt as indicated by the dashed line above.
Mounting Screws
The TillerClutch is shipped with two 1-3/4” (45mm) screws, but 1-1/2” to 2” screws are available from marine or hardware stores if needed. Always use #8 (4.2mm) flat-head or oval-head stainless steel screws. Avoid steel or galvanized screws.
Preparation
After determining your preferred positioning, lightly mark the location on the tiller with a pencil. It is best to then remove your tiller from the boat and support it squarely upside down on a padded work surface. Hold the TillerClutch in the marked position on the tiller. Be certain to line it up squarely on the bottom surface of the tiller with the lever toward the forward end. Insert the provided screws through the two mounting holes, and tap them with your screwdriver handle to make well-defined drill marks. Remove the device before drilling. Do not to use the TillerClutch as a drill guide.
Wooden Tillers
For wooden tillers, drill a hole exactly centered on each drill mark 1/2” (12mm) deep with a 1/8” (3.2mm) drill bit. Keep the drill bit perpendicular to the surface of the tiller. Tighten the screws in place by hand with a No. 2 Phillips screwdriver.
Aluminum Tillers
On aluminum tillers, carefully tap a center punch or sharp nail with a hammer precisely on each screw mark to properly center the drill bit before drilling. Careful alignment is important. Using a 1/8” (3.2mm) drill bit, precisely center the bit in the enlarged dents. Stop the drill the instant you are through the first surface. For a stronger mounting, use the above tap and machine screws. To prevent galvanic corrosion and to add strength, apply a drop of Loctite® red “threadlocker” 262 to the threads of the screws before screwing them in. Avoid over tightening the screws to prevent stripping of the new threads.
Securing the Control Line to Your Boat
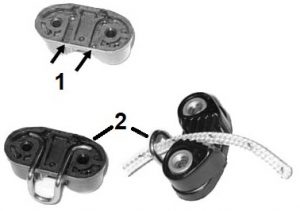
The control line should be routed to the coamings and/or transom within easy reach on each side. Use fairlead V-cleats or cam cleats (not horn cleats) to speed minor adjustments, lift the tiller, provide transom access, etc. For the simplest layout, put cleats on the coamings close to the TillerClutch with the tiller hard to the side, or a bit aft if needed. Small fairleads or eye straps can be added on the transom to route the control line in a “W” shape to clear fuel lockers, etc. On small boats, the cleats may be placed on the transom alone if convenient. For placement on the transom (see diagrams above), measure out from the rudder approx. 1/2 the length (L) from rudder pintles (the pivot point) to TillerClutch. Note: Properly seal all screws. The internet is full of info on drilling and sealing screws in fiberglass.
A note on “tiller pilots” (autohelms for tillers)
The TillerClutch does not use or interfere with tiller pilot mounts and is quite compatible with them. It is ready to be engaged for manual steering as soon as the tiller pilot is removed from the rudder. Make sure to keep the TillerClutch disengaged whenever an electronic tiller pilot is in use.
Maintenance
The TillerClutch is made to withstand the heavy abuse and corrosive environments typical to sailboats. Like most good sailboat hardware, it needs only minimal maintenance. We will be glad to clean or repair it for you. See our limited lifetime warranty.
Control Line Replacement
The TillerClutch works best with a good grade of 3/16” (5mm max) diameter double-braid yacht rope. (Some ropes are too thick to run smoothly.) We use Sta-Set™ by New England Ropes. It is important to keep your control line in good condition. If it becomes worn or frayed, it should be replaced. This is essential because a worn-out rope could bunch up and jam within the clutch mechanism, inhibiting tiller movement. Replacement ropes are available from the WaveFront website at www.WaveFrontMarine.com. If you cut your own rope, the melted ends can not exceed the diameter of the rope. Tightly wrap paper masking tape around the rope, and cut it in the middle of the tape with sharp scissors. Then melt the ends of the rope with a lighter before unwrapping the tape. Be careful not to get burned on the plastic or breathe any smoke.
Cleaning
Caution: DO NOT lubricate the lever mechanism with WD-40® or any other lubricant or solvent-based cleaner. Solvents can damage the specialized, synthetic self-lubricating bushings and possibly void the warranty. The TillerClutch should be periodically rinsed with fresh water (and mild soap if necessary). Work the lever while running water through the opening beneath it to rinse the internal components. Avoid sandy conditions, and promptly rinse out any sand or salt.
To keep any exposed stainless steel shiny, lightly clean with water and a bit of Bar Keepers Friend cleanser. This product is available from most grocers, and it will do a surprisingly good job on all your stainless deck hardware.
Slippage/Emergency Override
The TillerClutch is designed with a safety slip factor to help protect the rudder from excessive loading in harsh conditions. This slip factor also allows the skipper to overpower the clutch for a steering correction in an emergency situation. Forcing the rudder with the TillerClutch engaged will not harm it, but it can cause excessive wear to the control line, so use the release lever whenever possible. A loop of the line around the tiller will help hold it in severe conditions, but use caution.
Service
There are no user serviceable internal parts. The stainless steel working spring is constrained under a substantial load. For safety reasons, the housing has been sealed with permanent stainless steel rivets. Caution: Removal of the rivets could be hazardous and will void your warranty. Every part and detail of your TillerClutch was painstakingly designed to provide years of trouble-free service. However, if you do experience any problems, please contact WaveFront, Inc. See our limited lifetime product warranty.
Return to Shop page.